


Leonida is built to encourage detours. Between Vice City's streets, local businesses, outdoor pursuits, criminal opportunities and story leads, there can be a huge number of possible destinations competing for attention. That freedom is part of the appeal, but it also means it can be easy to lose track of the next mission, forget the location of a useful shop, or overlook a newly discovered activity.
The GTA 6 Index is the main tool for bringing order to that map clutter. Rather than forcing players to search manually through every icon, it organizes discovered points of interest into clear categories. It can be used to identify story missions, optional jobs, robbery opportunities, vehicles services, weapons dealers, places to eat, style options and much more.
For players guiding Jason and Lucia through the game's open world, regularly checking the Index should become a routine. It is both a mission list and a directory of places worth revisiting, with options to select a destination and begin navigating there immediately.
How to open the GTA 6 Index
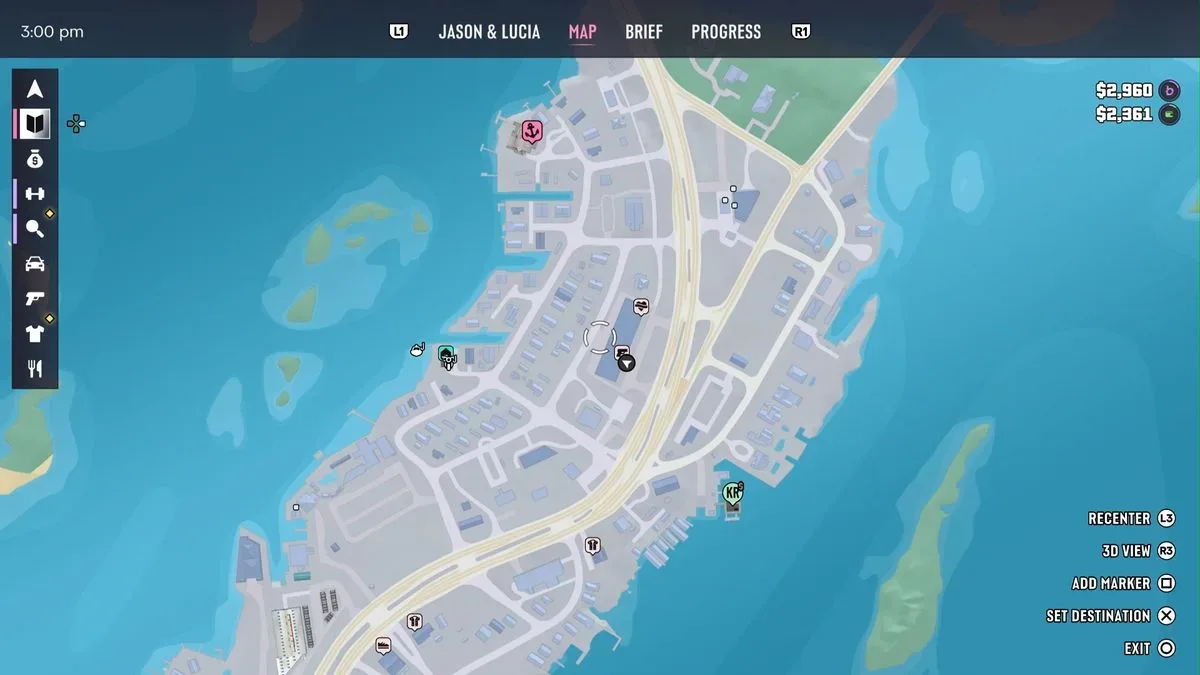
Start by opening the map with the touchpad. The map shows nearby activities, stores, missions and opportunities that have already been found during exploration. This is useful for a quick local overview, but it does not necessarily reveal every available category at a glance.
For useful background on this topic, read GTA 6 Fuel Guide: How to Refuel Cars, Find Gas Stations and Charge EVs.
To open the Index itself, press Right on the D-pad while viewing the map. This brings up the Index bar along the side of the screen. From there, players can move through its icons to browse the various types of content and services they have discovered.
The system is particularly helpful once the world begins to fill with markers. Instead of trying to distinguish each symbol on a crowded map, select an Index category first and narrow the search to the kind of objective needed at that moment. Looking for a story mission is different from looking for a garage, an Ammu-Nation store or a fishing spot, and the Index separates those goals cleanly.
Every GTA 6 Index category explained
The Index is divided into several sections, each identified by its own icon. Its listings are based on discoveries, so entries expand as Leonida is explored and new opportunities are found.
Personal
Marked with an arrow symbol, Personal is the section for property and player-related utilities. It tracks personal vehicles, the characters' residence, owned garages and ATMs used for cash deposits. This is the place to check when a vehicle has been left behind, when a return trip home is needed, or when it is time to manage money through an ATM.
Story
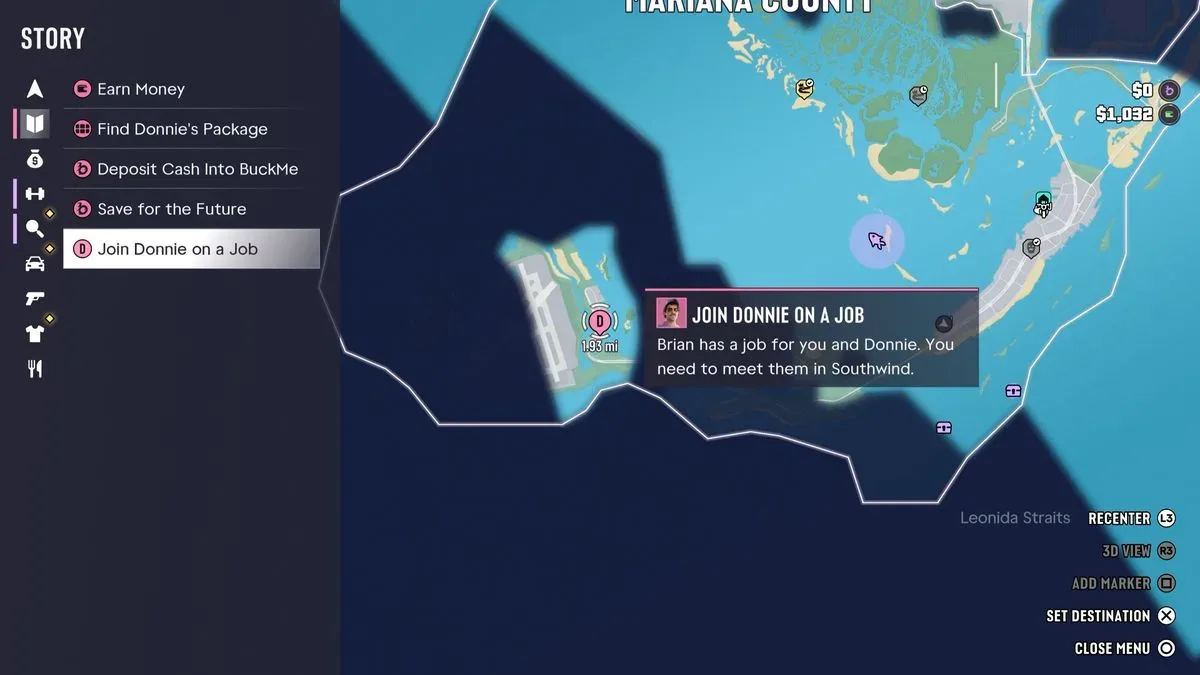
The diary icon opens the Story category. This is the most important section for anyone focused on progressing the main narrative. It lists missions that advance the story, while a separate Optional grouping contains missions that can be completed whenever the player chooses.
That separation is valuable because it prevents optional content from being confused with the next major narrative step. If the aim is to continue Jason and Lucia's central journey, check the standard story listings. If there is time for side content without immediately pushing the plot forward, look under Optional.
Robberies
The bag-of-cash icon is dedicated to Robberies. It collects active criminal opportunities, including discovered banks, vehicle drop-off points, stick-up opportunities and gang hideouts. This makes the category a useful stop for players who want to seek out money-making or crime-focused content rather than follow the story path.
Since these opportunities depend on what has been uncovered, returning to this menu after traveling through a new area can be worthwhile. A fresh discovery may create a new robbery option that was not previously visible.
Activities
The weights symbol represents Activities, a category for recreational and competitive pursuits. The section includes discovered races, shooting ranges, golf courses, hunting locations, fishing spots, gyms and clubs.
This is likely to be one of the broadest tabs for players taking a break from missions. Whether the goal is competitive driving, target practice, exercise, sport or a more social outing, the Activities page provides a direct route to the places that support those pastimes.
Exploration
Marked by a magnifying glass, Exploration gathers content tied to roaming and curiosity. This includes points of interest, optional quests, stunt-jump and base-jump locations, plus pawn shop collectors.
Players who prefer to clear the map, chase unusual discoveries or locate less structured side content should make a habit of opening this tab. It is the category most closely associated with the rewards of simply wandering through Leonida and finding something unexpected.
Vehicles
The car icon opens the Vehicles section. It includes Mod Shops, Pay 'n' Sprays, Gas Stations, transportation hubs, ferry terminals and unlocked garage locations. In practical terms, it is the maintenance and travel directory.
Use this tab when a vehicle needs attention, when looking for transport connections, or when trying to locate one of the garages available to the characters. It is also a helpful category to consult before a longer trip, particularly if a ferry terminal or other transport hub offers a more convenient route than driving across the map.
Weapons
The gun icon identifies the Weapons category. It acts as a directory for discovered Ammu-Nation locations, divided by Everyday, Premium, Hunting and Pawn specialties.
That division should make it easier to find a shop suited to a particular need rather than treating every weapons location as identical. Players looking to prepare for a mission, replenish supplies or browse a specific kind of weapon retailer can use the Index to identify the relevant discovered location.
Style
The shirt icon leads to Style. This category keeps a record of shopping and customization destinations, including clothing stores, tattoo locations, and places to update hair and makeup for both Jason and Lucia.
Because these services are not always needed during mission-to-mission travel, their locations can be easy to forget. The Style listing means cosmetic changes do not require memorizing every storefront encountered during free roam.
Food
The knife-and-fork symbol opens the Food tab, which tracks Food & Drink locations. Its listings include bars, cafes, convenience stores, fast-food venues and liquor stores.
Like the Style category, this tab creates a convenient reference for places that may be encountered casually during exploration but revisited later. It also helps underline the range of everyday locations spread throughout Leonida's open world.
How to set an active destination
Once the desired mission, task or location has been found, move the cursor over it to read its details. Press X to make it the active destination. This sets the current route target, allowing the player to focus on reaching that selected objective instead of searching for it again.
Only one active destination can be set at a time. That limitation makes choosing the immediate priority important, especially when several story leads, activities and robberies are available at once. If plans change, simply return to the map or Index and select a different entry.
There is also a faster free-roam option. Quick Navigation is activated by holding Down on the D-pad and pressing R3 while targeting an in-world marker. This offers a useful shortcut when the destination is already visible in the environment and there is no need to browse the full Index first.
Use map markers for secondary plans
Although only one location can be active, players can still place multiple personal markers on the map. Open the map with the touchpad, highlight a useful location and press Square to drop a marker.
This is useful for organizing a longer outing. For example, a player could set a story mission as the active destination while leaving map markers on a nearby Mod Shop, an Ammu-Nation location and an activity that may be worth visiting afterward. The active route remains dedicated to the main target, while the additional markers preserve the rest of the plan.
Watch for newly discovered opportunities
The Index does more than store old information. It also helps identify new discoveries. Anything newly added is marked with an orange diamond symbol in the Index. When returning from exploration, check for these diamonds before picking the next destination.
That small indicator can prevent newly found missions, side activities or services from being buried among established map entries. It is especially useful in a game world designed to offer many distractions, since a chance encounter in one part of Leonida could unlock something worth pursuing elsewhere.
Ultimately, the GTA 6 Index is most effective when treated as part of the regular gameplay loop: open the map, check the categories, look for orange diamonds, select the next priority and leave additional markers for later. Whether the immediate goal is story progress, a robbery, a new vehicle service or a simple detour for food and recreation, the Index provides the clearest way to decide where to go next.
Community
Discussion
Start the conversation.
No comments have been posted yet.