

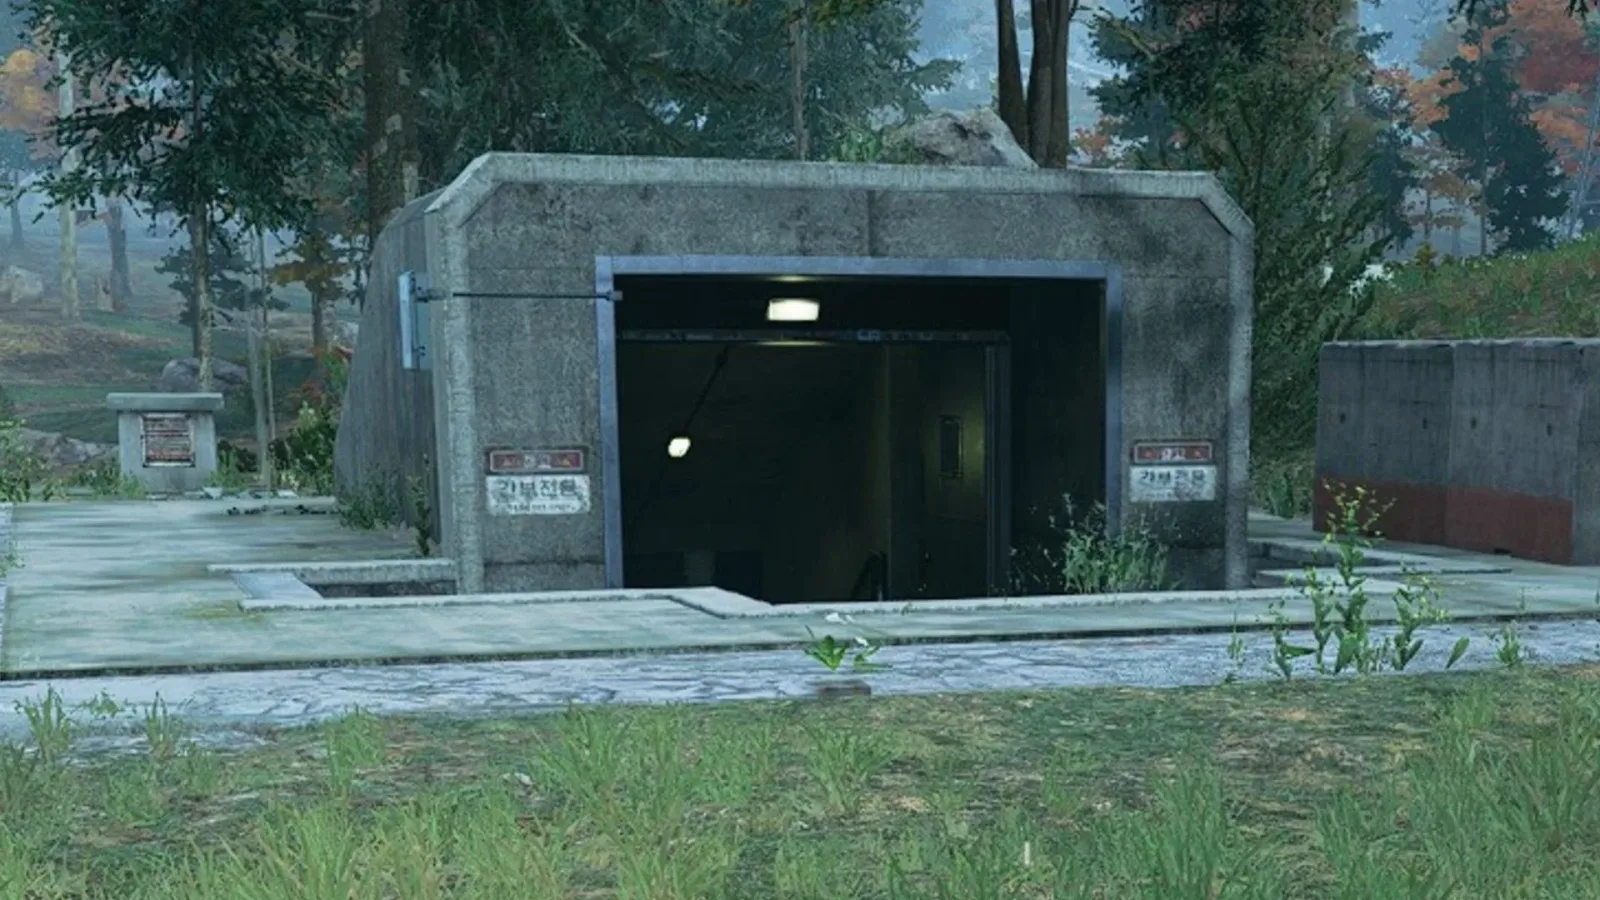
Keys are among the most useful and most stressful items to carry in MW4 DMZ. They can come from Story Missions, world loot, or other operators, and each one promises access to lockers, offices, vaults, armories, and other high-value rooms. The complication is that a key's name generally identifies a destination or a broad district rather than putting a precise door marker in front of the player.
That makes a little preparation especially valuable. Instead of taking an unfamiliar key into a match and wandering into danger hoping to recognize its destination, players can sort their stash by region, build a run around several nearby objectives, and decide whether the reward is worth the risk. Some locations, such as the Political Prison, the casino, bank tower, and Haneul Nuclear Reactor, demand more planning than an ordinary looting detour.
This guide organizes every known DMZ key by the part of the map where it is used. Repeated entries are intentional: several keys, including Blackmarket Weapons Locker, Silo Control Room, Fire Station Storage, Gun Store Weapons Locker, Police Station Armory, Hanex Bank Vault, and DRC Locker keys, have more than one potential destination. When that happens, the key is best treated as flexible loot rather than something tied to one exact building.
Political Prison keys
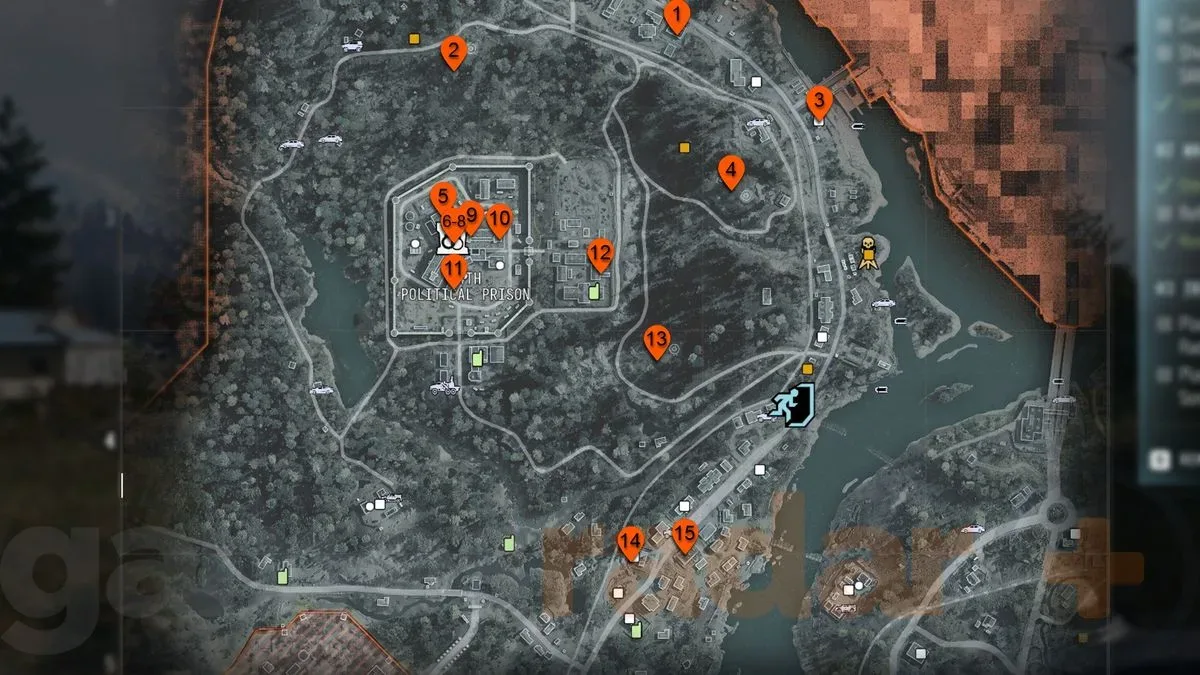
The Political Prison in the northwest is one of the most important places for players holding flexible keys. It is also a common spawn area, making it convenient early in a deployment but potentially busy before teams have spread across the map. The first few locations below can be approached around the prison zone, while many of the Citadel and prison-specific rooms require players to breach further into the complex.
For useful background on this topic, read Bey Rivals codes: All Active Rewards for Spins, Tickets, and Bey Points.
- Blackmarket Weapons Locker
- Silo Control Room
- Police Station Armory
- Silo Control Room
- Kang's Arms
- Incinerator
- The Citadel Secondary Control Room
- The Citadel Main Control Room
- The Citadel Side Access
- The Citadel East Wing Storehouse
- The Citadel East Wing Office
- South Block Armory
- Prison Encampment Storage
The Blackmarket Weapons Locker and Silo Control Room keys are particularly worthwhile in this section of the map because they can be used in multiple areas and the northwest provides opportunities to spend them quickly. By comparison, Citadel rooms, the Incinerator, and the prison storage locations are more committed objectives. Expect opposition when moving into the prison itself, and avoid entering with a bag full of irreplaceable gear unless the squad is prepared to fight its way back out.
Cheongun Village and Mirae General Hospital keys
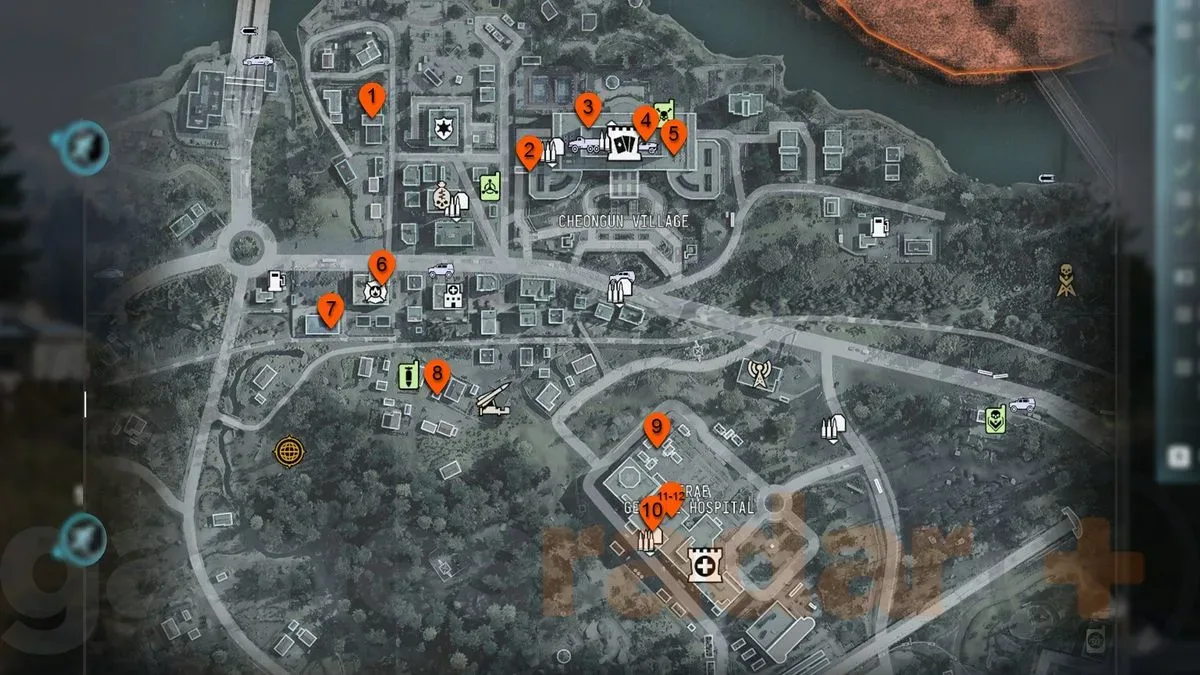
Cheongun Village offers a more straightforward looting environment than the prison. Its smaller buildings make it easier to sweep across several key destinations in a single match. Mirae General Hospital and the nearby Heavenly Luck Casino are more restrictive and more dangerous, however. The casino in particular is a difficult target, so a strong weapon loadout and medical supplies are sensible before committing to it.
- Gun Store Weapons Locker
- Heavenly Luck Casino Ground Floor
- Jin-Tae's Private Lounge
- Counting Room Vault
- Vault Armory
- Fire Station Storage
- Rail Depot Storage
- Mechanic's Shack
- Mirae Electrical Room
- The Doctor's Command Office
- Hospital Chemical Lab
- Hospital Chemical Locker
The Counting Room Vault is an especially notable early Story Mission reward. If that key is in your inventory, it is usually worth planning the whole deployment around a controlled entry into the casino rather than treating it as a casual stop. Clear a route, have enough healing on hand, and preserve an extraction path. The hospital keys similarly reward an organized approach: group the Electrical Room, Doctor's Command Office, Chemical Lab, and Chemical Locker together if possible instead of making separate high-risk trips.
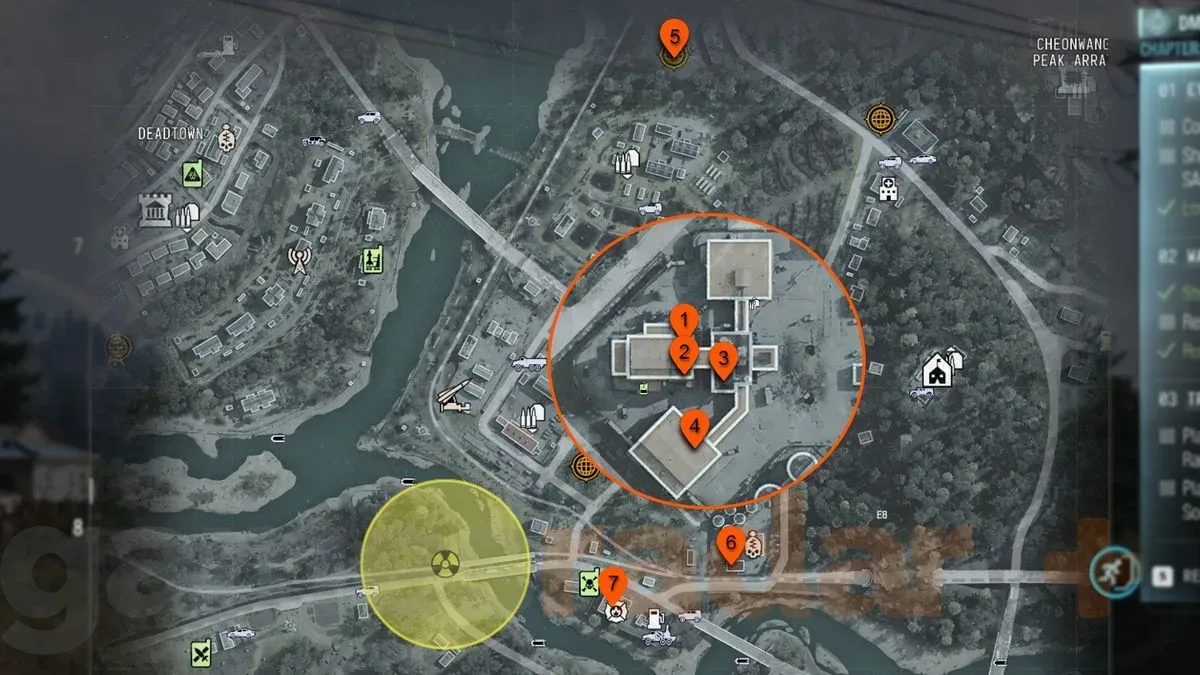
Haneul Nuclear Reactor keys
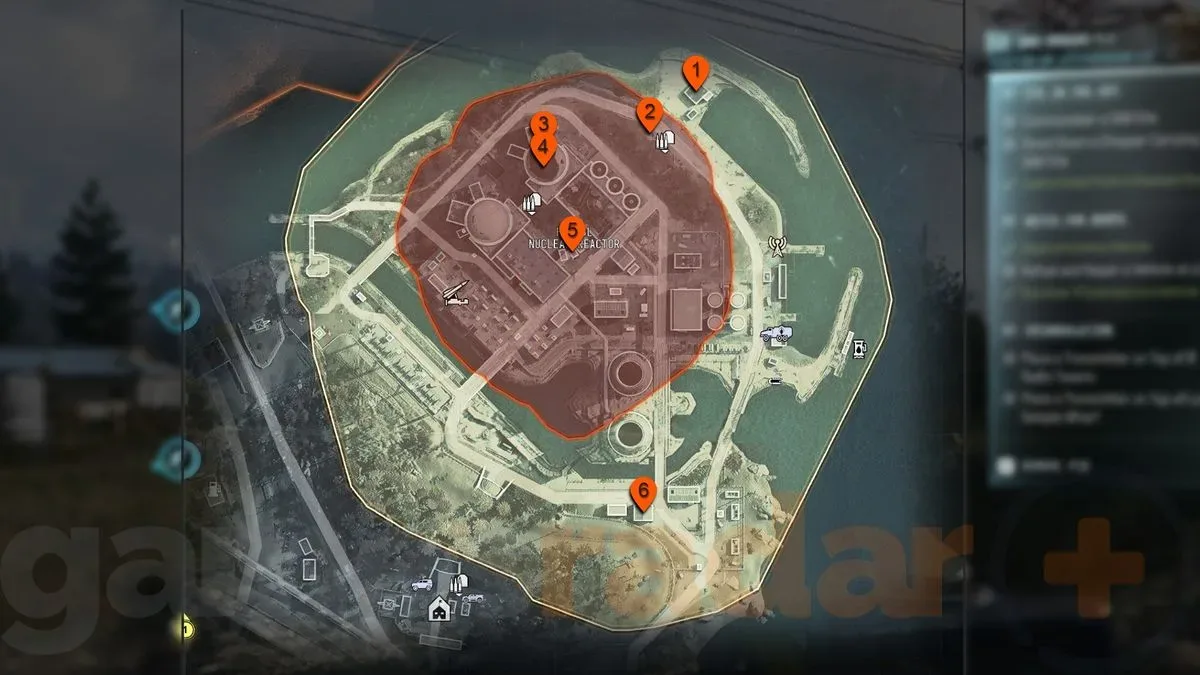
Haneul Nuclear Reactor is the least forgiving destination on the map. A radiation field damages players who enter without a gas mask, but a mask is not unlimited protection. It deteriorates over time, meaning a reactor run is a race against both enemies and the environment.
- Haneul Boat House
- The Chemist's Secure Armory
- Reactor 02 Control Room
- Reactor DRC Locker
- Utility Maintenance Storage
- Hazard Storehouse
For that reason, reactor keys are usually best kept in the stash until the team can dedicate a deployment to the area. Enter with the necessary protection already secured, know which key room is the priority, and do not waste the safe window searching aimlessly for secondary loot. The Chemist's Secure Armory and Reactor 02 Control Room sound tempting, but their value does not eliminate the need for an exit plan. If the gas mask timer or squad health situation is turning bad, leaving alive with the key's rewards beats forcing one more room.
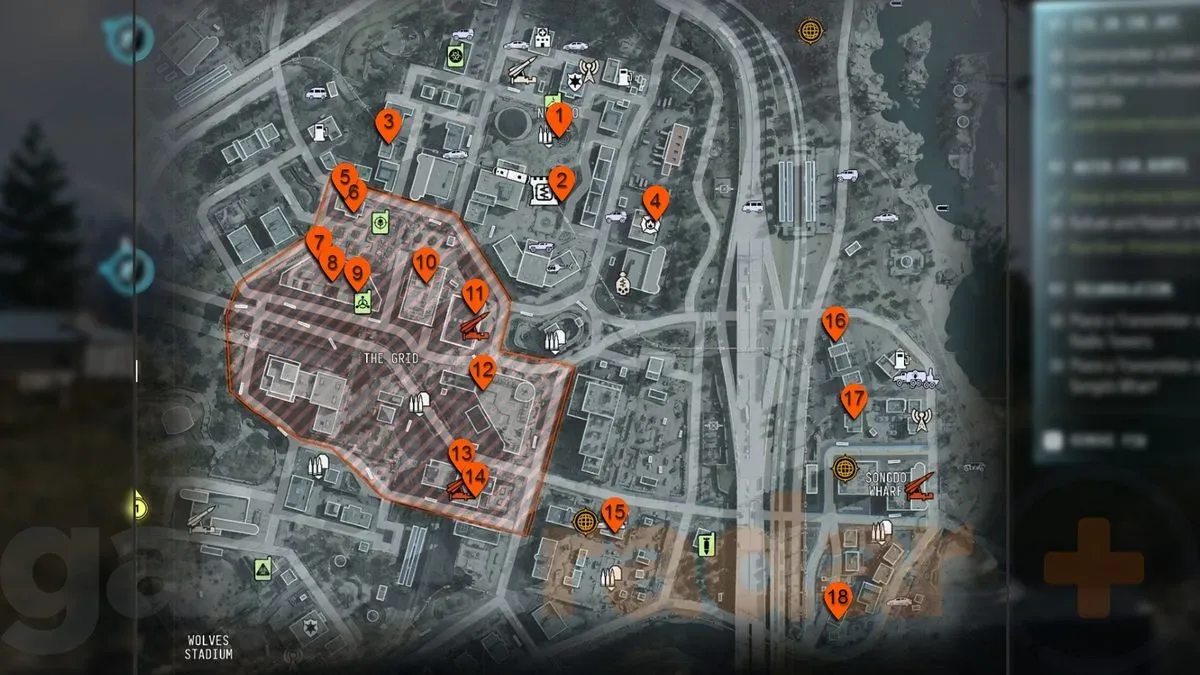
The Grid and Sangdo Wharf keys
The Grid and Sangdo Wharf contain one of the densest collections of key destinations. This is also the core banking district, with several possible Hanex Bank Vault targets. That flexibility makes a bank vault key useful, but one of the relevant banks is the main bank tower inside The Grid, which is a high-threat area.
- Shopping DRC Locker
- Jang-ui's Converted Power Room
- Coin Mining Den
- Fire Station Storage
- Hanex Bank Vault
- Downtown Branch Lobby
- Main Netshin Security Office
- Netshin IT Room
- Roze's Highrise Armory
- Executive Arms Auction
- Hanex Guard Station
- Lucera Suite 703 Bedroom
- Design Center Director's Office
- Hanwoori Art Records Room
- Gas Station Electrical Room
- Gun Store Weapons Locker
- Hanex Bank Vault
- Old Barber Shop
This region is excellent for players who want to maximize a single key-focused run. A Hanex Bank Vault key can be brought toward the bank locations in and around The Grid, while the Netshin, Lucera, Hanwoori, and design center objectives can make the same journey more productive. The trade-off is exposure: dense urban routes provide more opportunities to be intercepted, and the bank tower should not be treated as a low-pressure destination.
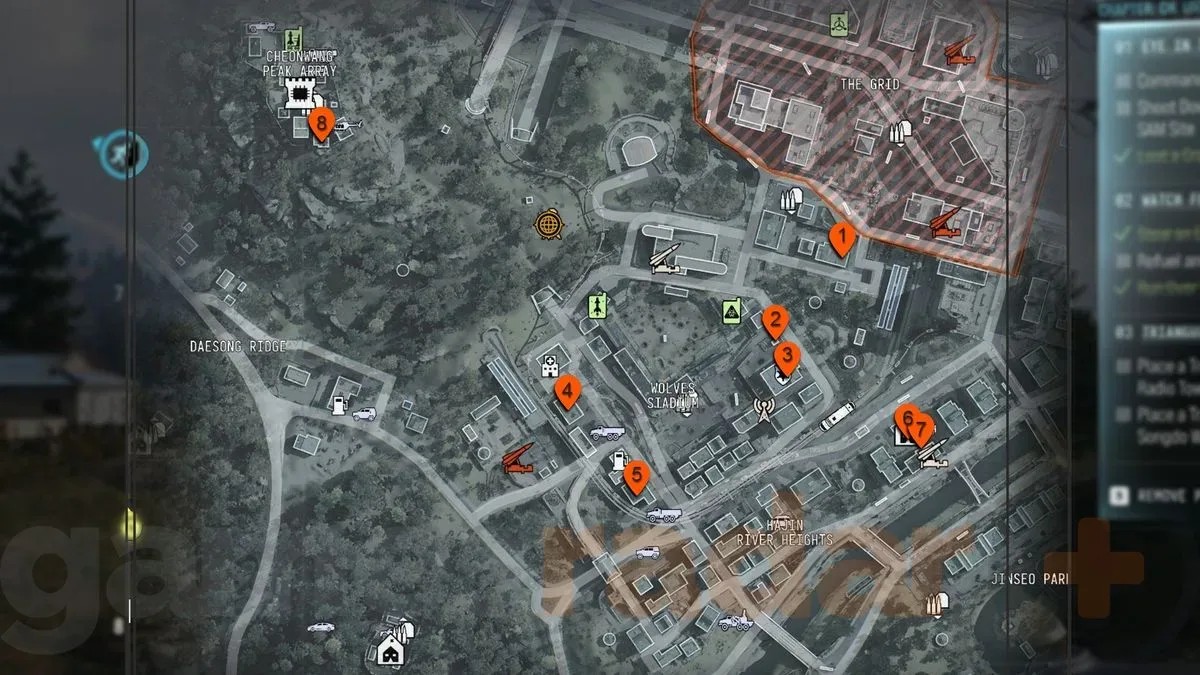
Wolves Stadium and Hajin River Heights keys
The southern side of The Grid connects naturally to Wolves Stadium and Hajin River Heights. This area includes another Hanex Bank Vault destination, as well as a police station target. Players carrying both police-related keys and sufficient backpack space can get considerable value from this route.
- Hanex Bank Vault
- Police Weapon Depository
- Police Station Armory
- Shop Records Room
- Hanex Bank Vault
- Gangbyeon Apartment B
- Militia Arms Depot
- Iskra's Control Room
There is a bank vault near the boundary with The Grid and another south of the stadium, giving the Hanex Bank Vault key more than one practical use in the broader district. The Police Weapon Depository and Police Station Armory also make this a strong area for a player who has been holding police keys while waiting for a convenient route. As always, do not overfill a backpack to the point that you cannot safely extract; a profitable key run can become a loss if a squad cannot move efficiently after opening its rooms.
Imjin Farmland keys
Imjin Farmland is comparatively isolated. There is less reason to detour through it without one of its dedicated keys, but that isolation can work in a prepared player's favor. Rather than visiting for a single door, collect several of the area's keys and make the farmland the main purpose of the match.
- Gorani's Scout Overlook
- Rice Mill Bunker Area
- Imjin Mill Foreman's Office
- Mill Explosives Lab
- Haejeok Radio Station
- Hoesik Supply Room
- Fire Station Storage
Most of these are unique to Imjin Farmland, with Fire Station Storage as the major exception. The mill-related destinations are particularly suited to a focused sweep, and searching the entire zone may uncover further keys that make the trip even more worthwhile. Players who only have a generic Fire Station Storage key may prefer to use it elsewhere, but anyone holding several of the named farmland keys should consider dedicating a deployment to this quieter part of the map.
Chang-San Air Base and Deadtown keys
Chang-San Air Base and Deadtown form another western route with multiple high-value targets. Like the Political Prison, this is a common spawn side of the map, which makes it useful for spending flexible keys early but also increases the chance of immediate contact with other operators.
- Silo Control Room
- Weapons Mod Workshop
- Field Depot
- Commandant Office
- Air Base Armory
- Air Base DRC Weapons Locker
- Silo Control Room
- Silo Control Room
- Underground Equipment Storage
- Underground Propaganda Store Room
- Re-Education Center Annex
- Haksan School Armory
- Blackmarket Weapons Locker
Air Base is a natural destination for players looking to improve their weapons, thanks to locations such as the Weapons Mod Workshop, Air Base Armory, and DRC Weapons Locker. It also gives Silo Control Room and Blackmarket Weapons Locker holders another useful option. The underground rooms, Re-Education Center Annex, and Haksan School Armory broaden the route into Deadtown, so do not assume the airfield itself is the only worthwhile stop.
Best practices for carrying DMZ keys
The most reliable approach is to treat keys as planning tools, not spontaneous errands. Before deploying, check whether multiple keys belong to the same region. A casino key and hospital keys belong together; several reactor keys justify a radiation-ready run; and bank, police, or city-office keys can be combined around The Grid and Wolves Stadium.
- Prioritize unique keys. A location-specific key may be harder to use later than a flexible key with several destinations.
- Use repeated keys where the route is safest. Silo Control Room, Fire Station Storage, Hanex Bank Vault, Blackmarket Weapons Locker, and similar keys do not always need to be spent at the first available door.
- Match gear to the destination. Bring gas-mask protection for Haneul, healing for hard indoor pushes, and enough space to carry rewards out.
- Plan extraction before opening the room. High-value loot is only useful if it leaves the map with you.
- Do not force a bad approach. If a prison breach, casino assault, or Grid bank tower is heavily contested, regrouping can be smarter than gambling a valuable key.
With the keys organized by district, MW4 DMZ becomes less about guessing at vague item descriptions and more about choosing the right deployment for the loot you already have. Whether the goal is a controlled farmland sweep, a risky vault visit, or a tightly timed reactor incursion, knowing where each key belongs is the first step toward turning a lucky find into a successful extraction.
Community
Discussion
Start the conversation.
No comments have been posted yet.