

Castlevania: Belmont's Curse asks players to do more than simply push forward through monsters and corridors. Its world is built around concealed routes, combat challenges, environmental puzzles, and rooms that may only reveal their full purpose much later. That structure is part of the appeal: progress feels earned, and discoveries can turn a previously intimidating stretch of the map into a much more navigable place.
Still, there is a difference between rewarding friction and unnecessary frustration. Rose's journey includes tough platforming, bosses that can demand repeat attempts, and exploration systems that the game does not always explain in detail. Fortunately, Belmont's Curse includes several tools and progression paths that can ease the sharper edges without removing the satisfaction of solving its mysteries yourself.
Whether a player is stuck on an arena, trying to decipher the map, or dreading a long trip back to a boss door, these five approaches can make the adventure more comfortable. They are not shortcuts around the game's ideas. Instead, they help make better use of systems that are already woven into its gothic labyrinth.
1. Adjust the gameplay settings without guilt
The most immediate way to tailor Belmont's Curse is through its gameplay settings. Evil Empire has included options that can change the severity of the game's punishment while leaving its exploration, atmosphere, and combat fundamentals intact. These settings are useful for players with very different needs, from people who are still learning the game's rhythms to experienced action fans who only want to reduce one especially irritating obstacle.
For useful background on this topic, read Mob Entertainment Cuts "Almost Entire" Escape From Playtime Team Weeks After Launch.
The most dramatic option is the ability to remove death as a consequence, but that is far from the only adjustment available. Players can tune the amount of damage Rose receives, increase the damage she deals, and alter experience gains to speed up her growth. If enemies are taking too long to defeat or character progression feels slow relative to a particular challenge, more experience can provide a less abrupt way to regain momentum.
Other changes target the specific sources of aggravation that can emerge in a metroidvania-style game. Boss runbacks can be reduced by selecting a respawn point outside a boss door. This is especially valuable when the real challenge is learning a boss's moveset rather than repeatedly crossing familiar rooms to earn another attempt. Healing potion availability can also be adjusted, giving players a little more room to recover from mistakes without making every encounter entirely consequence-free.
Platforming hazards deserve special attention. Spike pits and traps can be brutal when Rose's movement does not feel natural to a particular player. Rather than allowing that friction to halt progress, trap damage can be lowered. The goal is not necessarily to make every room effortless; it is to ensure that the player is spending time on the parts of Belmont's Curse they find engaging instead of getting stalled by one mechanical annoyance.
For another perspective on this story, read Castlevania: Belmont's Curse Tips: Maps, Mirrors, Works of Mercy and Notre Dame Lasers.
Think of these settings as a personal difficulty toolkit, not a binary easy-mode switch. A small boost to healing or experience may be all that is needed. There is no universal "correct" configuration when the point is to enjoy the adventure and see where its secrets lead.
2. Treat the map as a puzzle-solving tool
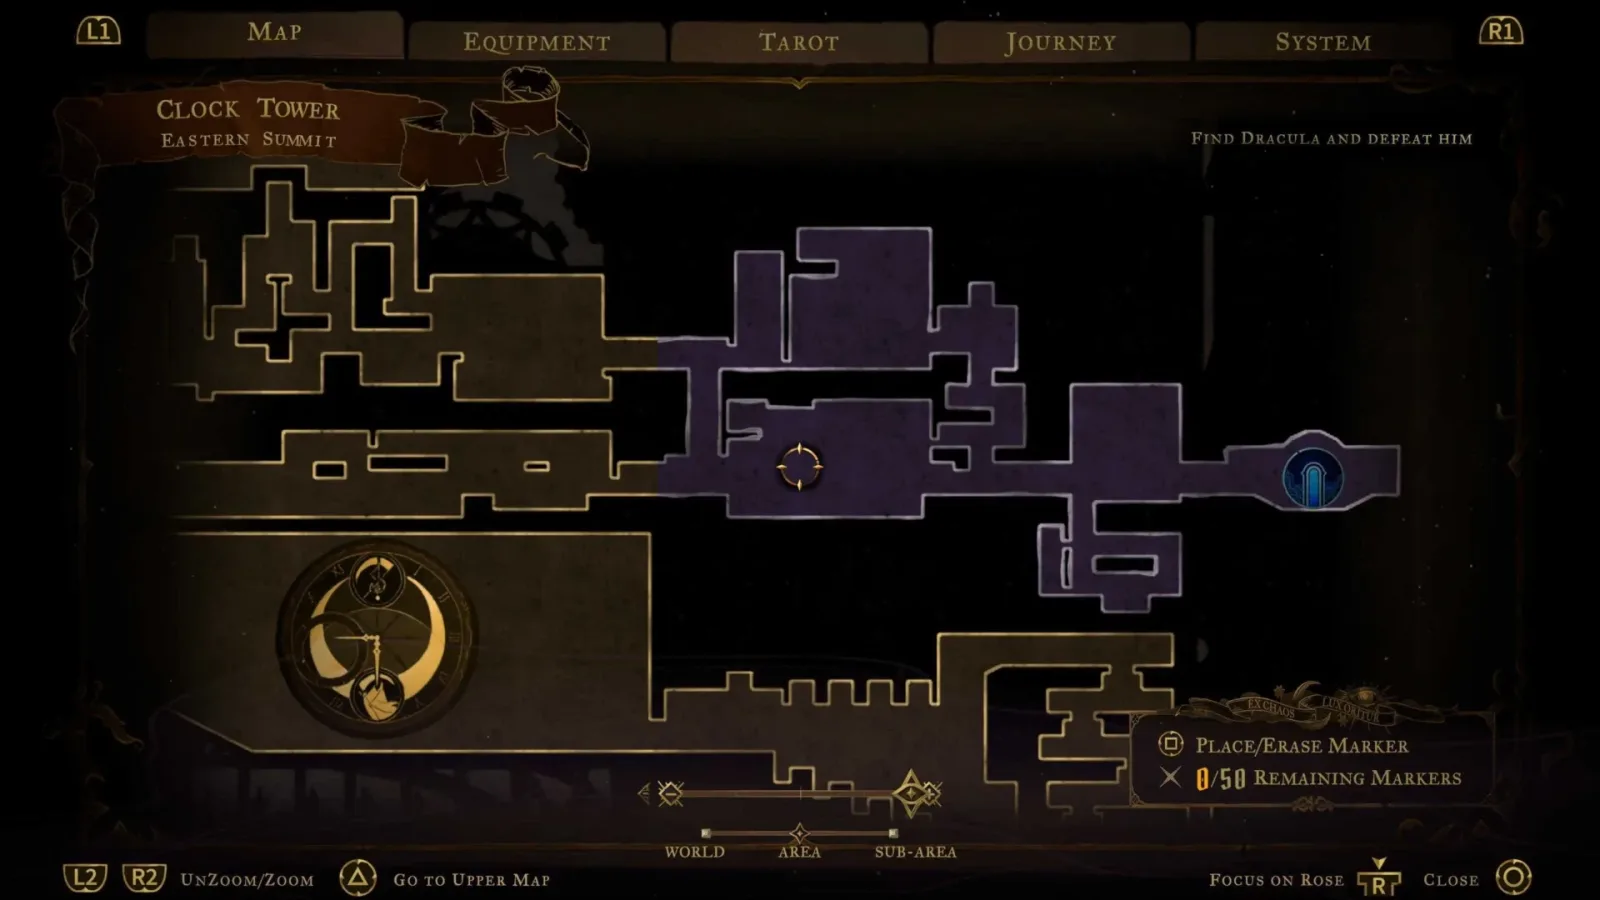
In Belmont's Curse, the map is more informative than a basic navigation screen. It records not only the shape of explored areas, but also clues about unfinished business. Checking it regularly can save a considerable amount of aimless backtracking and can often point players toward the kind of discovery they should be seeking next.
Room colors are particularly important. A room with a brown background has been fully completed, while a purple room indicates that something remains undiscovered. That could mean a hidden route, a collectible, an unopened chest, or another secret worth revisiting after Rose gains a new ability. For players who like to clear an area thoroughly before moving on, this color language provides a reliable checklist without spelling out every answer.
The map can become even more purposeful in locations such as Dracula's Castle and Notre Dame. Important rooms may be rendered with distinct details, and those details can function as environmental hints. When seeking the chains connected to the Sage, for instance, the map can communicate both the number of chains still required and the rough direction in which they can be found. It is a subtle design choice, but it rewards observation and makes the game's puzzles feel less opaque.
Do not overlook the player-placed markers. There are 50 markers available, which is enough to build a useful personal record of the world. Place them at suspicious walls, locked passages, treasure that cannot yet be reached, unusual puzzle devices, or rooms where an enemy arrangement suggests a later challenge. If an object appears important but its function is unclear, marking it is much better than trusting that it will be remembered several hours later.
A practical approach is to use different mental categories for markers. One group can be for inaccessible rewards, another for apparent puzzle leads, and another for routes that require a new traversal tool. The markers may look identical, but a consistent habit makes the map much easier to read when returning to an old region.
3. Complete Works of Mercy to strengthen Rose's tarot magic
Rose can find seven types of weapons, and it is worth experimenting until one suits a preferred style. Some players will favor a weapon that provides direct damage and simple timing, while others may get more value from range, speed, or a particular attack pattern. Yet weapons are only one part of Rose's combat kit. Her tarot cards are where some of her most powerful offensive and defensive options become available.
Each boss defeated grants a new spell. On its own, that reward expands Rose's options, but the spell can become substantially more potent through its associated Works of Mercy. These side objectives are tied to the boss rewards and are often straightforward tasks that players may already be close to completing naturally.
The payoff can be enormous. A sufficiently upgraded spell, especially when Rose is also at a healthy character level, can alter the tone of a boss battle or combat arena. Rather than relying solely on perfect dodges and weapon pressure, players gain powerful tools for survival, crowd control, or burst damage. This can be the difference between barely surviving an encounter and having enough breathing room to understand what is happening.
The Brittle King's spell is a particularly useful example. Fully upgrading it makes Rose exceptionally hard to kill while also improving her damage output. That combination can be valuable not only against bosses, but also in the dangerous enclosed arenas where several threats compete for attention at once.
Works of Mercy should not be dismissed as optional chores to postpone until the endgame. One task linked to the Brittle King involves defeating 25 haunted armor enemies, and many players will have already surpassed that number by the time they encounter him. Check the active objectives whenever a boss spell is earned; a little focused progress can lead to a major power increase.
4. Use mirrors for more than saving
Mirrors initially appear to serve a familiar function: they are places to save progress. But once Dracula's Castle has been unlocked, they can also open the door to a much more convenient way of moving around explored areas.
Kneeling in front of a mirror transports Rose to a concealed space that connects to nearly all of the mirrors unlocked in the current area. From there, a selected mirror can carry her to another point in that zone. This changes the rhythm of exploration significantly. A collectible spotted near an earlier mirror, a purple room that needs another look, or a missed side path no longer has to demand a long walk through rooms that have already been cleared.
The mirror space is not merely a menu disguised as a location. It has its own puzzle element, and solving that mystery further develops how the system works. Players who want to preserve the surprise should investigate it gradually rather than seeking an explanation immediately.
Until that puzzle is resolved, mirror travel is limited to travel within a zone. Moving between larger regions still requires the Ferryman. It is worth remembering that distinction when planning a cleanup route: use mirrors for local efficiency, then rely on the Ferryman when the objective lies in a different major section of the map.
5. In Notre Dame, prioritize the boss before every secret
Notre Dame presents one of the most useful route-planning opportunities in the middle portion of Belmont's Curse. After Dracula's Castle becomes available, Rose heads into the church, where the final boss room is sealed behind three lasers. Those lasers must be shut down individually, but their influence extends beyond the boss gate itself.
Many of Notre Dame's optional challenges and hidden rewards are arranged around those active beams. That means trying to fully clear the area before confronting its boss can turn ordinary platforming into a far more punishing task. A chest at the end of a difficult route is considerably less appealing when laser fire is adding pressure to every jump and every attempt to recover from a misstep.
The efficient strategy is to focus on disabling the required lasers, reach the boss, and win that fight before attempting comprehensive cleanup. Once the boss-door lasers are gone, those beams are removed elsewhere in Notre Dame as well. Returning to earlier challenges afterward makes many of them dramatically easier to approach.
This does not mean ignoring every detour on the first visit. Pick up rewards that are convenient, keep an eye on purple map rooms, and mark anything that looks worthwhile but overly dangerous under current conditions. The key is resisting the urge to force every secret immediately. In a game built around revisiting and recontextualizing spaces, leaving a few objectives for later is often the intended and more enjoyable choice.
Let the game's systems work together
Belmont's Curse is at its best when combat progression, careful observation, and smart navigation reinforce one another. Gameplay settings can eliminate a frustrating obstacle; the map can identify where to return; mirrors can make that return quick; and Works of Mercy can give Rose the strength needed for what waits there. Notre Dame then offers a reminder that progression order itself can be a solution.
Players do not need to unravel every hidden room immediately or conquer every challenge at maximum difficulty to have a satisfying run. Use the tools available, make notes with map markers, build up tarot spells, and return when a difficult area is more favorable. The castle's mysteries are still there to solve--just with less needless punishment along the way.

Community
Discussion
Start the conversation.
No comments have been posted yet.